Showing posts with label frock. Show all posts

Wednesday, October 14, 2015

How to sew Shoulder

Hello friends! Today, in this tutorial i'm going to teach how to sew shoulder for any garment. 

First finish the front neck line and then stitch the back neckline.  Attach the facing at top side as   picture 1. Don't enclose the edge of the facing, after joining the shoulder, you can stitch on your machine or hand hem.

fig 1


Keep the  back shoulder and front shoulder right sides together and keep the edges and sides coinciding. (see fig 2)


Fig 2

open the facing of the back neckline and keep in line with front neckline.Fig 3


Fig 3
 Turn the facing over the front neckline . Pin it and sew along the dotted lines fig 4

fig 4
  after joining the shoulder it should something like  fig 5
Fig 5

  Now  attach  the back neckline facing to neckline. The dotted line in Fig 6 indicates hand hem/ straight stitch on machine as you wish. Fig 6.
Fig 6
 you can use this method of sewing the shoulders for dresses and frocks and other garments.

Stay-Stitching tutorial


Hello everybody! Here i'm again with another tutorial in the series 'sewing techniques". After having learnt how to do top-stitching, under-stitching we will now see how to stay-stitch.


It is best to stay stitch soon after cutting the neckline. It is stitched only on a single layer of fabric. It prevents the stretching of the curved or angled edge as they are cut across the bias. The bias cut fabric is more stretchable and eventually they lose its shape. Stay stitch is best for retaining the neckline shape.

Stitch the regular length along the curve or bias within the seam allowance. These seams are not visible on the  right side of the garment.

If you Stitch  the neckline, then it is good to start from one shoulder to  the center of the neckline,  and turn the piece and then  start again to sew from the other shoulder to the center of the neckline. Or you can also start from the center and sewing to one shoulder, turn the piece again and sew the center to shoulder.


Tuesday, October 13, 2015

How to stitch a neckline with facing

 Facing means  a piece of material sewn inside of the garment,especially at the neck and armholes to strengthen it. In this tutorial, I'm gonna tell you how to stitch a neckline with facing.

Firstly, stay stitch around the neckline immediately after cutting the neckline. Now, place the neckline on the folded fabric as in Image 1.


Image 1
  Mark along the neckline carefully as in Image 2.

Image 2

Mark  extra 1 1/2" from the neckline towards outside of the neckline (that is "RR")  PP is original neck line and P R is the width of the neckline facing (image 3).

Image 3
cut the neckline facing (both along RR and PP) Image 4

Image 4

After cutting the neckline facing, stitch the outer side of the edge by folding 1/2"inward and sew along the shape to prevent the threads coming out from here and there along the edges.
Image 5 neckline facing

Lay the right side of the neck line flat, Place the facing on top (,right side to right side). Match the facing around the neckline edges and pin the facing in place (.Image 6)
  

Image 6
Stitch  a seam  at  1/2" in from the edge along the neckline edge . Take care that the seam line follows the curve.   When  stitching  the neckline curve,  stitch slowly and  smoothly, raise the pressure foot and turn  the fabric through slightly  and lower the pressure foot and continue stitching.  Be careful and don't straighten the fabric otherwise it will lose its shape. Clip the seam allowance around the neck  edge with intervals. but don't cut the seams as Image  7
,

Image 7

 pressing the seam allowance towards facing, understitch and  turn the facing towards inside of the neckline. image 8


Image 8
After turning the facing,  topstitch the edge along the neckline image 9 .


that's it!! u re done!!!!  
TIP: You can make necklines of various shapes with this technique, not just a circular one.
        You can also use this technique and add a border to your neckline line as done in this tutorial

Please share ur experiences in the comments below.. :) Thanks everybody!!

Tuesday, February 17, 2015

Evening Gown

My latest project is this evening gown... the circumference of the gown I really large.. u wont      believe it if i say it was around 5.5 m!!!! My daughter wished for such a gown some time ago... 
I was searching for a good fabric.. finally I'm relieved that i hav done it at last.....

This is a self-drafted dress. I traced the measurments directly onto the cloth. I cut the bodice, sleeves, collar, skirt, and long stripe. First I cut two pieces for the front bodice as it is like a shirt in its upper part. For the back part,  I cut as usual, but separately {as i previously got the front part}. I have used normal sleeves for this garment. It is a half circle/umbrella skirt . I chose the red color fabric as it is there in the bodice fabric and interface.  I cut the long strip of red cloth {seen in below and right in the following image} for the skirt's bottom.


So, that was the cutting part.. Now coming to the sewing and attaching phase,  I started with sewing the 3 darts on the front, towards the sides & on the back parts.                  


Next I sewed the the button plackets and  attached  red color fabric on the button hole placket  which looked really nice when done.


I stitched  three sides of the collar  with interfacing, after which, I used  binding along three sides of the collar with bodice fabric.            


 Nextly, I joined the shoulders and then attached the finished collar to the neckline.


I added the binding  to the sleeves and attached the sleeves into armhole, then sewed  the sleeve-seams and side-seems of the dress .


At the bottom of the skirt I used double layered red color fabric ,which beautified the entire look of the gown along with increasing the length of the skirt (which was what I intending n the first place ;p)


Lastly I sewed the bodice and skirt pieces together.


And then.... the gown was ready... Yippie!!


Tuesday, August 26, 2014

Summer Froly Dress

 hello everyone... its been a long time since i posted something.... my daughter had vacations recently and like me she too got herself into sewing in free time... now its her newly found hobby n shes crazy about it.

this time she sewed this frock.. honestly speaking, i just loved it.  the pattern nd everything - she designed it all herself.. good amount of mathematical calculations she has put into making this piece.. She made this out of two old dresses.

This is how it looks....


and the back...


Now, let me tell u how this was made. Let's start with the back. 

She wanted to insert an invisible zip, so she had to take two halves for the back. So each half was again divided into two diagonal halves so as to give the appearance as u see in the photo.


 n now the front piece... it is full of diagonal strips as u can see.. the green n yellow ones alternately arranged.. the diagonal pieces starting from the neck area eased her work of sewing the neckline....


 and this makes the front piece.. onto  some cutting now n then joining the front and back pieces.. this frock is a sleeveless one so u need not worry about sleeves.. the arm border has a red binding , the same thing she applied for the border of the bottom piece also..
 For the bottom part.. its just six pieces of vertical cut cloth arranged in such a way that the green one comes in the centre both back n front... n ther u are ... THE FROCK'S READY!!!!


Friday, July 26, 2013

Frilly - Brilly Gored Frock


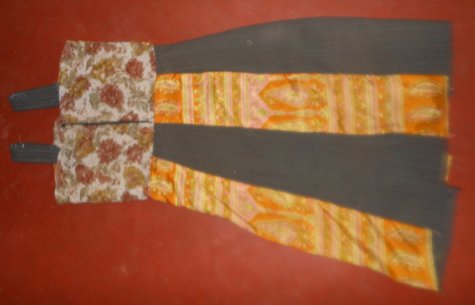
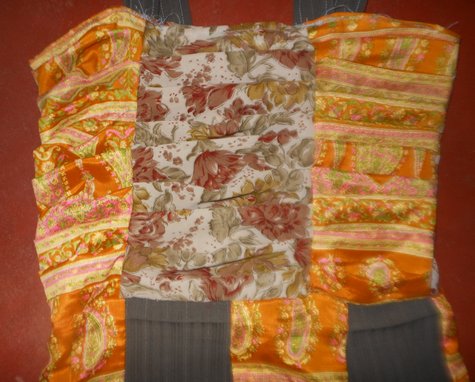
Again my daughter sewed this for herself. She started off with ripping apart all parts of a pant (the brown colored) that was no longer her size. She created the skirt part by alternating the brown and orange gores fitting the waist at the top and a little more towards the bottom. The top part was a little complicated both in planning and sewing and of course a little in appearance too. The center piece and the orange pieces on the two sides are all frilled on the edges creating small pocket-like spaces. the back side of this part has a zipper to give the fitting to the bodice. At last come the pipelines which she found to be the most difficult to stitch as she could not get the exact measurement which would give a perfect fit. I helped her out in this based on my experiences. One can wear this alone or you would love to pair it with an inner tee!


Thursday, March 7, 2013

How to sew Baby frock

Pattern drafting
  

This  Sleeveless frock is so easy  and simple to sew  for kids  and Babies. 

Construction:-

   A to B = C to D = chest/4 +1 inch
  A to C = B to D =  Length +1 inch
  A to H = A to G = 2 inch

  A to E   = shoulder/2 
  B to F   = Chest/6
  D to I = 1/2 inch

Cut the bodice part in 4 folds, along the red lines
Cut  open  on this line  G to C  the back part only , to create button placket. The placket facing is one side 2 inch and another side 1 1/2. 
 Attach the skirt part by making frills to the body part, after sewing the placket.


 Skirt

 A to B = C to D = Twice of 'P', where P = chest/4 + 1
 A to C = B to D = skirt length +2 inch
C to E  = D to F = 1 inch,  for folding.

Wednesday, March 6, 2013

How to sew simple frock

Pattern drafting tutorial


You can  make a frock pattern for your baby girl /girl child and stitch a nice frock for her by yourself with love and affection. So start stitching for your kid.

A to B  =  C to D    =  Chest /4 + 1.5 inch
A to C  =  B to D    =   Length   + 1 inch
A to G  = A to H    =   2 inch
A to E  = 1/2 Shoulder.
B to F   = Chest /6
D to I   =  1/2 inch


Hands :-

A to B = C to D = Chest/ 6 + 1.5 inch
A to C = B to D  = Length  =  1 inch
A to E = B to F  =   2 inch
C to I   = 1/2 round of the hand + 1 inch
C to G  = D to H  = 1 inch


Skirt :-
1 to 2 = 3 to 4 = Double of (chest/4 +1) 
1 to 3 = 2 to 4 = length + 2 inch
3 to 5 = 4 to 6 = 1 inch


Wednesday, October 3, 2012

Crepe Pink frock


First i stitched this frock  with a v neckline and kimono hands,and later i changed into round neckline and short hands.The frock was little bit tight so i refit it by attaching a leaf pattern now it has good fitting. I modified this two times as my daughter loves it a lot.