Showing posts with label dresses. Show all posts

Sunday, November 6, 2016

How to Sew a Party Wear Gown

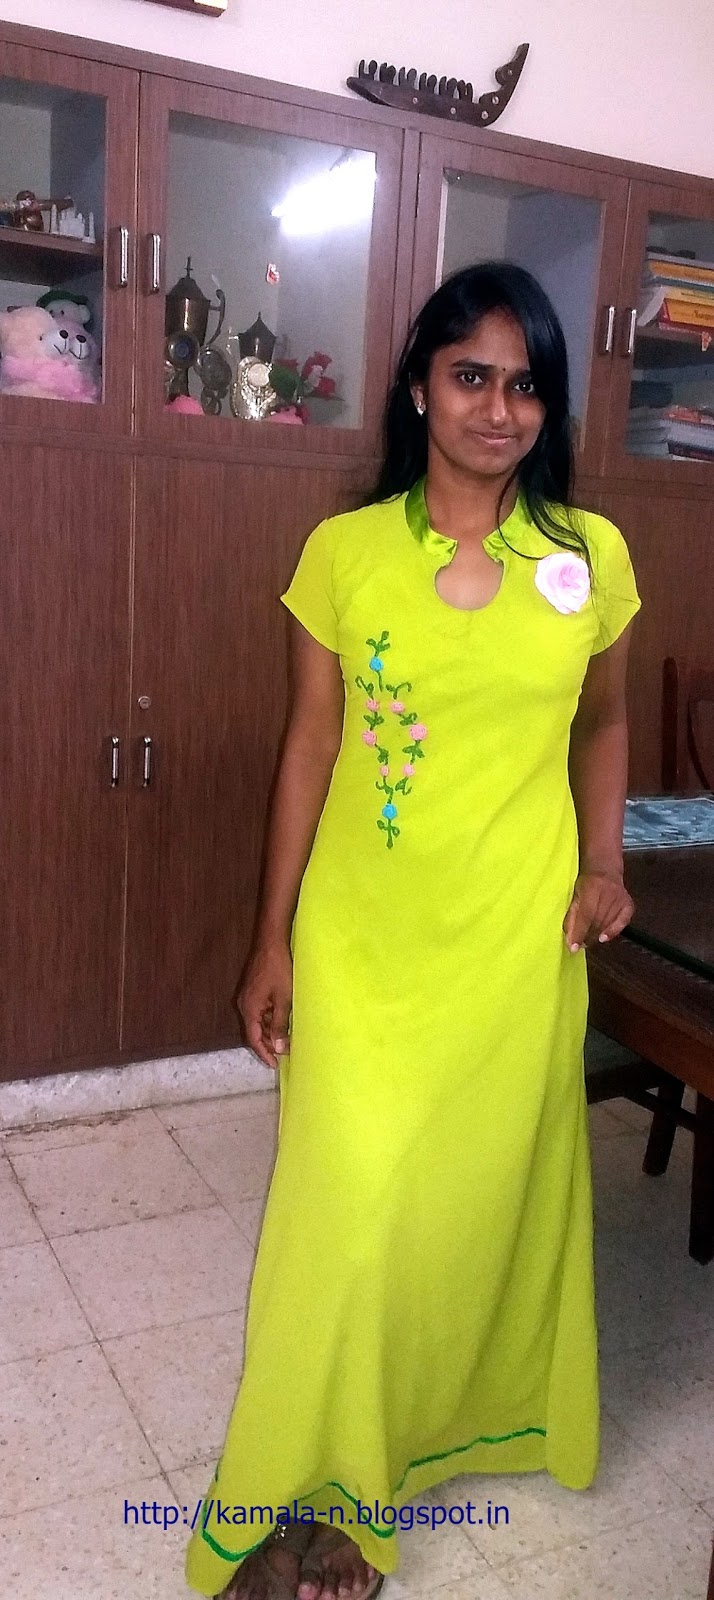
Hey  friends how are you. I am back here after a long time.In this post I want to share how I stitched this simple and  elegant party wear gown. I designed and sewed this gown for my daughter to wear to a party. She liked it very much. Even her friends admired it a lot. I hope you would like it and also try to sew it.


I prepared the pattern according to the body measurements I required. For the neckline, I wanted to have a mandarin collar with small curve as a continuation. 
The neckline width is kept 2.5" and depth of the neckline for collar  is 4". The depth of the hole (or the curve I mentioned before) is 3". Back neckline depth is 0.5". Flare of the dress at bottom measures 16". I cut the pattern on double folded paper.


Pattern
 Next, I opened up the pattern and placed it on the fabric a little diagonally as in the figure below. I then cut the bodice parts separately. (Sorry, I forgot to click a photo for this step so i drew one instead so that you can get a clearer idea. :) )  I also cut the lining cloth similarly. I used Chiffon fabric for the dress and Satin fabric for the lining. These fabrics that I have used were so slippery , I had a hard time with them. So I cut the fabrics with the help of my daughter!


Firstly, I attached the front part with the lining and joined the back parts also similarly. Next I sewed the curve part below the neckline by attaching facing and then attached the shoulders. Then I stitched the collar with satin cloth and attached to the neckline.

After that I attached the sleeves and joined the bodice parts along the length of the fabric. I thought of adding a velvet ribbon at the bottom and it came out of pretty well!!. On one side,  I embellished with a flower (the big pink rose i bought from a local shop here) and on the other side I embroidered bullion roses with chain stitch stems and leaves. Bullion roses n the bullion knot stitch have been my daughter's favorites since she was a kid... so she insisted that I made these on her dress. :)  Lastly I closed the collar with a nice button, But I took these photo before stitching the button so I cant show you!


   It was a great task completing this dress within a day! It was a sudden plan and my daughter wanted it for a party the next day..



Wednesday, October 14, 2015

Kurti / Straight - Cut Kameez Sewing tutorial


 I have already posted the method of drafting kurti/Straight - Cut  Kameez here is the link drafting tutorial


  Cutting


Fold the fabric according to the hip measurement that is  1/4th of hip + 1.5".and mark the measurements directly on the cloth according to the draft.  

Length                 =               O - L
Neck width          =               O - A
Shoulder              =               O - D
Shoulder drop      =               D - F
Armhole              =               D - E
Chest                   =               From fold to C.
Waist length        =               O-H
Waist                   =                P-Q
hip length            =                O-J
Hip                      =                J-K 

When finished  ,cut along the shape (along the marked scissors in fig 2)
Remember one thing that you have to cut the front and back neckline separately. Also note that you have to cut the front and back armhole separately.  

Fig 2
After cutting, the kameez will look like the one in fig 3.


Fig 3 after cutting 


FIg 4
Cut the sleeves according to the draft. Cut the inner curve shape at the front armhole
(fig 5&6).


Fig 5

Sleeves Fig 6
 First finish the back neckline and front neckline separately.

Fig 7 Back neckline
 Then join the shoulders.

Fig 8 

Sew the back neckline with hand hem or machine stitch. In fig 9 the dotted line indicates hem or machine stitch.

Fig 9

Place center point of the sleeves at the shoulder line (joint) by  keeping right sides together and also matching the armhole front curve to sleeves' front curve. (in Fig 10, O indicates the shoulder joint and N is center of the sleeves) leave 1/2"  from the edge, for seam allowances .
  
Fig 10
Keep pins binding the sleeves to armscye (armhole) and sew along the seam line.  I have shown  the seam line by marking the dots in   the fig 11 .
Fig 11 Sleeves attaching


after attaching the sleeves. 

fig 

fig 13

Join the side edges of the sleeves and right sides of the body together and mark the seam line  by keeping  1" seam allowance from the edge. Start sewing from sleeves and up to slit/side opening.
 (keeping slit length  from hip circumference that is J K  to bottom of the kameez, Repeat the same for the other side of the garment too.
 You can easily understand through the figs 14&15


Fig 14


fig 15 sewed the sides
Fig 16 indicates the slit or opening

Slit opening fig16
Stitch the bottom edge of the kameez by  double folding inside. Stitch the Back and front bottom edges separately.

Slit opening


Stitch the slit from the side edge of the back part to that of the front part, 1/2" above through the joining of the kameez by folding in double towards inside. When you are stitching from back to front, before going to front, stop  1/2" above  where the slit open turn the kameez towards you, stitch across the foldings.

Again turn towards you and start stitching at the end by folding the sides. the images 17,18 and 19 give clear information

Pin over double fold on the back side edge towards the wrong side of the kameez. Start stitching from  bottom to  till 1/2" above of the joining of the sides of kameez,. There, you turn the fabric towards you and stitch across the folding and another side and  turn again and continue stitch until you reach the edge.
Repeat the whole thing for the other side of the garment.
Images 17


image 18

Image 19


How to sew Shoulder

Hello friends! Today, in this tutorial i'm going to teach how to sew shoulder for any garment. 

First finish the front neck line and then stitch the back neckline.  Attach the facing at top side as   picture 1. Don't enclose the edge of the facing, after joining the shoulder, you can stitch on your machine or hand hem.

fig 1


Keep the  back shoulder and front shoulder right sides together and keep the edges and sides coinciding. (see fig 2)


Fig 2

open the facing of the back neckline and keep in line with front neckline.Fig 3


Fig 3
 Turn the facing over the front neckline . Pin it and sew along the dotted lines fig 4

fig 4
  after joining the shoulder it should something like  fig 5
Fig 5

  Now  attach  the back neckline facing to neckline. The dotted line in Fig 6 indicates hand hem/ straight stitch on machine as you wish. Fig 6.
Fig 6
 you can use this method of sewing the shoulders for dresses and frocks and other garments.

Stay-Stitching tutorial


Hello everybody! Here i'm again with another tutorial in the series 'sewing techniques". After having learnt how to do top-stitching, under-stitching we will now see how to stay-stitch.


It is best to stay stitch soon after cutting the neckline. It is stitched only on a single layer of fabric. It prevents the stretching of the curved or angled edge as they are cut across the bias. The bias cut fabric is more stretchable and eventually they lose its shape. Stay stitch is best for retaining the neckline shape.

Stitch the regular length along the curve or bias within the seam allowance. These seams are not visible on the  right side of the garment.

If you Stitch  the neckline, then it is good to start from one shoulder to  the center of the neckline,  and turn the piece and then  start again to sew from the other shoulder to the center of the neckline. Or you can also start from the center and sewing to one shoulder, turn the piece again and sew the center to shoulder.


Tuesday, October 13, 2015

How to stitch a neckline with facing

 Facing means  a piece of material sewn inside of the garment,especially at the neck and armholes to strengthen it. In this tutorial, I'm gonna tell you how to stitch a neckline with facing.

Firstly, stay stitch around the neckline immediately after cutting the neckline. Now, place the neckline on the folded fabric as in Image 1.


Image 1
  Mark along the neckline carefully as in Image 2.

Image 2

Mark  extra 1 1/2" from the neckline towards outside of the neckline (that is "RR")  PP is original neck line and P R is the width of the neckline facing (image 3).

Image 3
cut the neckline facing (both along RR and PP) Image 4

Image 4

After cutting the neckline facing, stitch the outer side of the edge by folding 1/2"inward and sew along the shape to prevent the threads coming out from here and there along the edges.
Image 5 neckline facing

Lay the right side of the neck line flat, Place the facing on top (,right side to right side). Match the facing around the neckline edges and pin the facing in place (.Image 6)
  

Image 6
Stitch  a seam  at  1/2" in from the edge along the neckline edge . Take care that the seam line follows the curve.   When  stitching  the neckline curve,  stitch slowly and  smoothly, raise the pressure foot and turn  the fabric through slightly  and lower the pressure foot and continue stitching.  Be careful and don't straighten the fabric otherwise it will lose its shape. Clip the seam allowance around the neck  edge with intervals. but don't cut the seams as Image  7
,

Image 7

 pressing the seam allowance towards facing, understitch and  turn the facing towards inside of the neckline. image 8


Image 8
After turning the facing,  topstitch the edge along the neckline image 9 .


that's it!! u re done!!!!  
TIP: You can make necklines of various shapes with this technique, not just a circular one.
        You can also use this technique and add a border to your neckline line as done in this tutorial

Please share ur experiences in the comments below.. :) Thanks everybody!!

Tuesday, February 17, 2015

Evening Gown

My latest project is this evening gown... the circumference of the gown I really large.. u wont      believe it if i say it was around 5.5 m!!!! My daughter wished for such a gown some time ago... 
I was searching for a good fabric.. finally I'm relieved that i hav done it at last.....

This is a self-drafted dress. I traced the measurments directly onto the cloth. I cut the bodice, sleeves, collar, skirt, and long stripe. First I cut two pieces for the front bodice as it is like a shirt in its upper part. For the back part,  I cut as usual, but separately {as i previously got the front part}. I have used normal sleeves for this garment. It is a half circle/umbrella skirt . I chose the red color fabric as it is there in the bodice fabric and interface.  I cut the long strip of red cloth {seen in below and right in the following image} for the skirt's bottom.


So, that was the cutting part.. Now coming to the sewing and attaching phase,  I started with sewing the 3 darts on the front, towards the sides & on the back parts.                  


Next I sewed the the button plackets and  attached  red color fabric on the button hole placket  which looked really nice when done.


I stitched  three sides of the collar  with interfacing, after which, I used  binding along three sides of the collar with bodice fabric.            


 Nextly, I joined the shoulders and then attached the finished collar to the neckline.


I added the binding  to the sleeves and attached the sleeves into armhole, then sewed  the sleeve-seams and side-seems of the dress .


At the bottom of the skirt I used double layered red color fabric ,which beautified the entire look of the gown along with increasing the length of the skirt (which was what I intending n the first place ;p)


Lastly I sewed the bodice and skirt pieces together.


And then.... the gown was ready... Yippie!!