Wednesday, May 29, 2013

How to make your own Churidar pyajamma

Churidar is an ethnic wear worn by most Indians and Pakistanis. Its length is more than the actual length to fall into gathers at the ankle. It fits tightly from below the knee to ankle. It is looks excellent with a tunic, kurta or a sharwani. It is better to cut the fabric on the bias to get a stretchy and nice fit below the knee.

Bias cut churidar 

In this method the pattern is cut on the bias (45 degree angle). You can draw the measurements     directly on the cloth (see fig. 3)  or you can make a paper draft  first and then place it on the cloth in bias (See fig 2).  Blue color indicates the pattern.


Measurements needed:-


Seat (hips) width.
Waist to floor ( length)
Thigh
Crotch
Knee circumference.
Ankle circumference.

Pattern Drafting:-

Length                  =           actual length (waist to floor) - 6 inches for belt (another piece)  
  
0- 6                         =           length + extra length for gathers
1- 3 , 6-10, 7-11    =           mark   1/2 the ankle circumference and draw a horizontal line 
6 -1                         =           for bottom folding 1" inch
6 - 7                        =           mark 10" or 12 "  inches for gathers (or as much as you wish)
0 - 7                        =           length (belt 6 inch excluding)
0 - 9                        =           1/4 of seat  + 4 inch (crotch)

8                             =           mid-point of  9 (crotch) and 7  = knee point

8 - 12                     =           half of circumference of knee
9 - 4                        =          1/4 of seat  + 4 (thigh)
4 - 2                        =          1 inch towards the inside
2a - 2                      =           vertical line                   

Join 3, 10, 11, 12, 4 & 2  shape out as shown in the fig.A.


The outer blue line shows 1 inch for seam allowance, that is 3 to 5
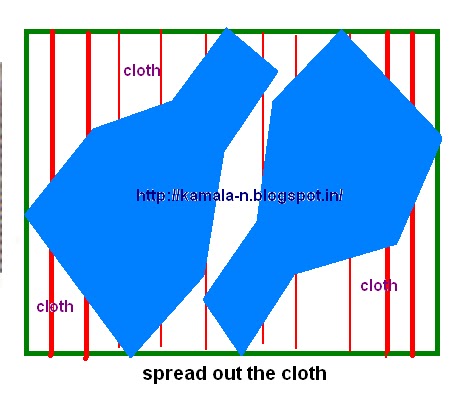
   For waist belt : hip measurement + 6 inch as width and length 8.5 inches (6 inch + 1/2 inch seam allowance + for casing to insert the drawstring or elastic).


                              fig 2


 The above fig (3) shows how to fold the cloth and how to mark the measurements on the cloth. The red lines indicate the folding of the cloth on bias.The green lines indicate the edges of the cloth. The space between blue and violet color lines indicates the seam allowances. Cut along the violet colored line.

We'll talk about the cutting procedure in my next post. 

1 comment: