I have already posted the method of drafting kurti/Straight - Cut Kameez here is the link drafting tutorial
Cutting
Fold the fabric according to the hip measurement that is 1/4th of hip + 1.5".and mark the measurements directly on the cloth according to the draft.
Length = O - L
Neck width = O - A
Shoulder = O - D
Shoulder drop = D - F
Armhole = D - E
Chest = From fold to C.
Waist length = O-H
Waist = P-Q
hip length = O-J
Hip = J-K
When finished ,cut along the shape (along the marked scissors in fig 2)
Remember one thing that you have to cut the front and back neckline separately. Also note that you have to cut the front and back armhole separately.
 |
| Fig 2 |
 |
| Fig 3 after cutting |
 |
| FIg 4 |
 |
| Fig 5 |
 |
| Sleeves Fig 6 |
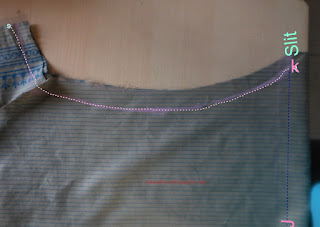
First finish the back neckline and front neckline separately.
 |
| Fig 7 Back neckline |
 |
| Fig 8 |
Sew the back neckline with hand hem or machine stitch. In fig 9 the dotted line indicates hem or machine stitch.
 |
| Fig 9 |
Place center point of the sleeves at the shoulder line (joint) by keeping right sides together and also matching the armhole front curve to sleeves' front curve. (in Fig 10, O indicates the shoulder joint and N is center of the sleeves) leave 1/2" from the edge, for seam allowances .
 |
| Fig 10 |
Keep pins binding the sleeves to armscye (armhole) and sew along the seam line. I have shown the seam line by marking the dots in the fig 11 .
 |
| Fig 11 Sleeves attaching |
after attaching the sleeves.
 |
| fig |
 |
| fig 13 |
You can easily understand through the figs 14&15
 |
| Fig 14 |
 |
| fig 15 sewed the sides |
Fig 16 indicates the slit or opening
 |
| Slit opening fig16 |
Slit opening
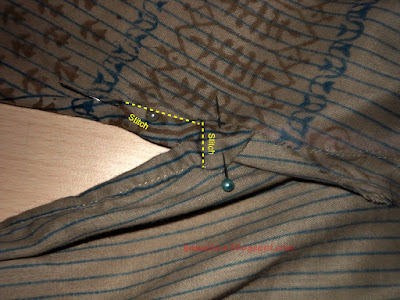
Stitch the slit from the side edge of the back part to that of the front part, 1/2" above through the joining of the kameez by folding in double towards inside. When you are stitching from back to front, before going to front, stop 1/2" above where the slit open turn the kameez towards you, stitch across the foldings.
Again turn towards you and start stitching at the end by folding the sides. the images 17,18 and 19 give clear information
Pin over double fold on the back side edge towards the wrong side of the kameez. Start stitching from bottom to till 1/2" above of the joining of the sides of kameez,. There, you turn the fabric towards you and stitch across the folding and another side and turn again and continue stitch until you reach the edge.
Repeat the whole thing for the other side of the garment.
 |
| Images 17 |
 |
| image 18 |
 |
| Image 19 |

Very very useful instructions for kurti. Even beginners can try this one. Good job!
ReplyDeleteThank you Sahlu hakki
Deletevery nicely described about kurtis. thanks
ReplyDeleteThanks for each and image that you have shown😊 actual images makes it easy to understand.😀Are you a teacher by profession?☺
ReplyDeleteThanks for sharing, Buy Festive Kurtis Online is an exciting journey that combines the richness of ethnic attire with the convenience and choices offered by e-commerce. As you embark on this digital shopping adventure, you'll discover a world of beautiful kurtis that are perfect for celebrating special occasions in style.
ReplyDelete