Showing posts with label stitch. Show all posts

Friday, November 20, 2015

How to Stitch an 'A'-line Kurti

This tuorial is on making an "A"-Line Kurti. It is very easy and the draft pattern is quite similar to that of a straight-cut kameez/kurti except for that it widens as we move down and has a flare.  


You can find the drafting in this tutorial. You should note that here, the width AB is (hip + 3"). Hip measurement would be as mentioned in the above tutorial (RS). Take extra 1" along the whole length as seam allowance.


If you would like to give the bottom a curve shape as I've done, then you should mark C as  the midpoint of AB and also BD = 3". Join the points making a curve. YOu can therwise simply go with the straight pattern as it is also equally popular.


The edges of the sides can either be closed or left often as a slit. Further steps are similar to the one in the kameez sewing tutorial. 

Happy sewing!!

How to sew a neckline with bias strip

This is a tutorial on neckline with bias strip. Make a bias strip from this tutorial. Fold it in half width-wise. Place this strip along your cut neckline.
Secure this bias strip with pins with the right sides facing together in this figure below. (the raw edges are to be kept together towards the neck line)


Sew it along the neckline. Invert it towards the wrong side. Rest of the method is similar to the one described in the tutorial on stitching neckline'


To end, don't forget to hem/machine stitch the edges. That's it!

Thursday, November 19, 2015

Sewing a Perfect Neckline - Quick Easy Tutorial!!


Hello Everybody... its been a while. So, today, i'm going to teach you the technique of stitching a perfectly neat neckline for your dresses and tops.. You could also check out the tutorial on stitching necklines in detail.

a) Firstly, you have to get an interface as it would make the neckline firmer. Fold the interface such that one leaf of the fold is about 2 inches more than your neck width measurement. the point would be 'O'. Mark your required neck measurement from 'O' ('A' in fig. 1). Then at 1" from 'A'  mark the point 'B'.
Fig. 1

b) Also mark the neck depth corresponding to point A n join the two points. at 1" from this point, mark another point. join this fourth point n 'B' as shown in fig.1. Take care the lines are parallel and straight. Cut along these lines. You will get a piece like the one in fig. 2.

Fig. 2

c) Now place the interface on facing (can be the same fabric as your dress or you can also choose another fabric if you want).. now keeping the sticky side of the interface over the wrong side of the fabric you took, iron over it carefully so that the shape's not disturbed. (Fig. 3).


Fig. 3

 Cut the extra fabric parallel to its edges.


d) Next, place this fabric piece over your dress with the right sides facing each other. The mid-point of the two fabrics should coincide. (Now, here u have to keep in mind that the fabric (front/back for whichever piece you are stitching the neckline) should not be cut anywhere for the neckline stitching)

Fig. 4

e) After this, secure the two fabrics with pins and then sew a straight line along the mid-line as in fig. 4. Another stitch along the inner border of the interface (yellow dotted line in fig. 5, yeah it is not that clear, I know!)


Fig. 5

 f) Now cut both the fabrics along the inner edge of the interface but about half an inch from the edge. See the fig. 6, you will understand better.


Fig. 6


g) Finally, you have to invert and turn this piece backwards so that it resembles the one in fig.7 Top-stitch over the inner border.


Fig. 7
h) Towards the wrong side it should look somewhat like this (fig. 8). You might want to hem the outer edge to secure it.


There you are.... ! Done with  the square neckline.. easy isn't it? You can sew any other shaped neckline other than the square one I have shown here. The procedure would remain the same.
Stay tuned for more posts and tutorials!!!

Wednesday, October 14, 2015

Stay-Stitching tutorial


Hello everybody! Here i'm again with another tutorial in the series 'sewing techniques". After having learnt how to do top-stitching, under-stitching we will now see how to stay-stitch.


It is best to stay stitch soon after cutting the neckline. It is stitched only on a single layer of fabric. It prevents the stretching of the curved or angled edge as they are cut across the bias. The bias cut fabric is more stretchable and eventually they lose its shape. Stay stitch is best for retaining the neckline shape.

Stitch the regular length along the curve or bias within the seam allowance. These seams are not visible on the  right side of the garment.

If you Stitch  the neckline, then it is good to start from one shoulder to  the center of the neckline,  and turn the piece and then  start again to sew from the other shoulder to the center of the neckline. Or you can also start from the center and sewing to one shoulder, turn the piece again and sew the center to shoulder.


Top stitching

Top stitching  is nothing but a stitch line on the right side of the garment. It is sewing a single row or multiple rows for a functional or decorative purpose.

 It holds the  facing or lining in place and keeps the edge flat. Do "under stitching" before top  stitching.. Lets get started.

 Press the facing inside and  start stitching on the   right side of the garment  nearer to the edge or about 1/4 away from the edge. It would be visible on the garment, so make sure stitching lines look neat and perfect.


Tuesday, October 13, 2015

How to stitch a neckline with facing

 Facing means  a piece of material sewn inside of the garment,especially at the neck and armholes to strengthen it. In this tutorial, I'm gonna tell you how to stitch a neckline with facing.

Firstly, stay stitch around the neckline immediately after cutting the neckline. Now, place the neckline on the folded fabric as in Image 1.


Image 1
  Mark along the neckline carefully as in Image 2.

Image 2

Mark  extra 1 1/2" from the neckline towards outside of the neckline (that is "RR")  PP is original neck line and P R is the width of the neckline facing (image 3).

Image 3
cut the neckline facing (both along RR and PP) Image 4

Image 4

After cutting the neckline facing, stitch the outer side of the edge by folding 1/2"inward and sew along the shape to prevent the threads coming out from here and there along the edges.
Image 5 neckline facing

Lay the right side of the neck line flat, Place the facing on top (,right side to right side). Match the facing around the neckline edges and pin the facing in place (.Image 6)
  

Image 6
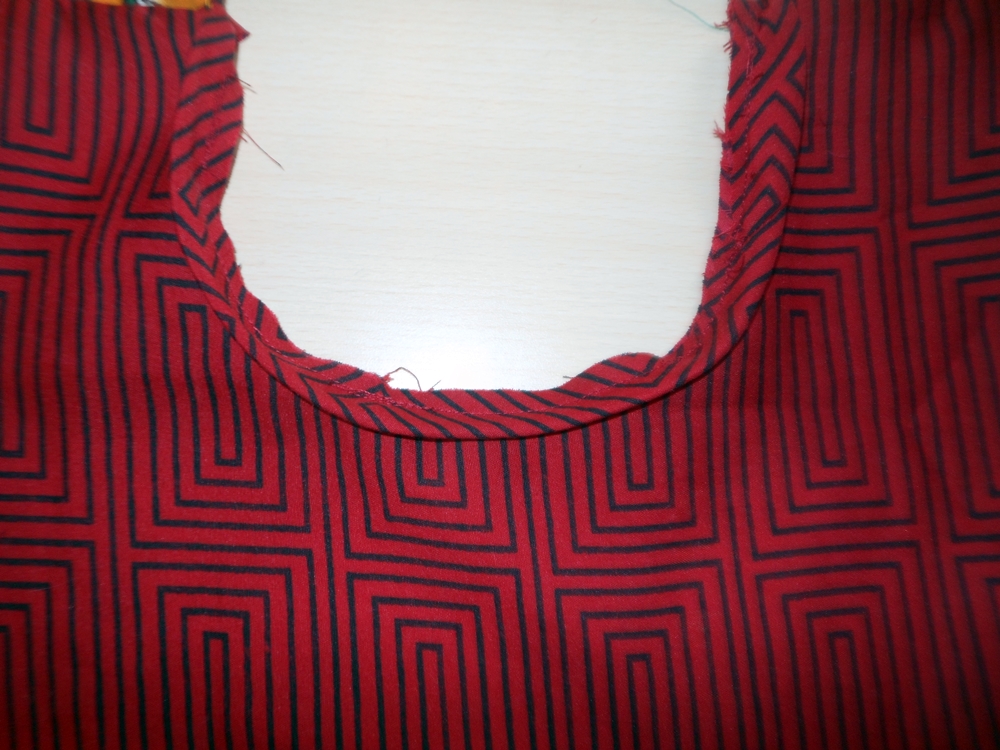
Stitch  a seam  at  1/2" in from the edge along the neckline edge . Take care that the seam line follows the curve.   When  stitching  the neckline curve,  stitch slowly and  smoothly, raise the pressure foot and turn  the fabric through slightly  and lower the pressure foot and continue stitching.  Be careful and don't straighten the fabric otherwise it will lose its shape. Clip the seam allowance around the neck  edge with intervals. but don't cut the seams as Image  7
,

Image 7

 pressing the seam allowance towards facing, understitch and  turn the facing towards inside of the neckline. image 8


Image 8
After turning the facing,  topstitch the edge along the neckline image 9 .


that's it!! u re done!!!!  
TIP: You can make necklines of various shapes with this technique, not just a circular one.
        You can also use this technique and add a border to your neckline line as done in this tutorial

Please share ur experiences in the comments below.. :) Thanks everybody!!